Saturday, 31 May 2014

Neon Quarter Given! Lip Art Tutorial ft Sugarpill & Born Pretty

I was toying with a lip art using some of the Sugarpill ElectroCute collection and these matching hex glitters from Born Pretty and I decided to go nuts and use all these colours! 

I created this quartered white, yellow, orange, & pink deliciously bright motif then separated the sections with these gorgeous Born Pretty Colorful Crystal Rhinestones, which I stuck on with Duo lash glue as always.

I totally recommend the Born Pretty Store embellishments and suggest you check them out here! And to save on pretty things for your fingers, I have a code for 10% off at Born Pretty, so just click here and type in "MIHW10" at checkout on any order!

And if you are in need of hot, hot neon pigments or pigmented awesome mattes, check out Sugarpill here, along with many other gorgeous shadows & lashes!

Enjoy!

Video Tutorial


Products Used
Rimmel Sift Kohl Kajal pencil in 071 Pure white to line lips
NYX Jumbo Eye Pencil in Milk
Inglot eyeshadow #496 DS
Sugarpill Chromalust loose Eyeshadow in Lumi
Sugarpill Sparkling Neon Pigment in Hi-Viz
Sugarpill Sparkling Neon Pigment in Supercharged
Sugarpill Sparkling Neon Pigment in Love Buzz
12 Colors Hexagon Nail Art Shiny Glitter Powder Sheets from bornpretty.com
(White, Yellow, Orange & Light Pink + Pink)
Born Pretty Colorful Crystal Rhinestones SS10 from bornpretty.com

Glitter/Rhinestone Adhesive
Fyrinnae Pixy Epoxy
Duo Lash glue


Disclaimer: Affiliate links contained in this post.

Monday, 26 May 2014

Dude looks like a Lady: Aerosmith gig Makeup & OOTD ft Sugarpill, Eye Kandy & Lime Crime

This is an old look but it's from when I went to the Aerosmith gig. I was going for a black and red look because of their album covers and colours in general, but ended up with this very gothic look especially when I put the outfit on. ;) I just had to wear my tiny top hat and Tripp skirt and that really spun it towards a gothic style.

I wanted a black smokey eye blended out into red and I used Sugarpill's Bulletproof and Love+ with a touch of Flamepoint on the inner edges and I added some Eye Kandy Cherry bomb glitter on top and the lips are both the red Lime Crime Velvetines in a gradient.

I will say that I was delightfully surprised when I came out of the dressing room and my boyfriend simply said "WOW". And I think a look has done it's job when it impresses people that see us everyday.

If you are in need of pigmented awesome mattes or hot, hot neon pigments, check out Sugarpill here, along with many other gorgeous shadows & lashes!

Enjoy!

Sometimes a makeup look doesn't end up the way we would like it but it's still gets to an awesome place. I really liked the look and might do a tutorial on it and take some better pictures, since I was rushed and they didn't come out too great.


Outfit

Black and red tule skirt
Atelier Leatherette boob tube
Ambra Black opaque 200 denier stockings
Pleaser Electra 2028 Knee High Flame boots Clubwear Australia
Studded Biker-style Leather jacket from Siricco

Accessories
Custom Leather Collar with from CollarFactory.com
Mini top hat with feathers
Solid Silver bangle from Zamel's


Makeup

Products Used

Eyelid primer
Two faced Shadow insurance

Lid
Maybelline Lasting Drama gel eyeliner in Blackest Black as base
Urban Decay eyeshadow in Creep
Eye Kandy sprinkles in Cherry bomb

Glitter adhesive
Eye Kandy Liquid sugar

Crease
Inglot eyeshadow #113R for transition shade
Sugarpill pressed eyeshadow in Love+
Sugarpill pressed eyeshadow in Flamepoint inner crease

Brow highlight
NYX Jumbo eye pencil in Milk
Sugarpill pressed eyeshadow in Tako

Lower lid
Urban Decay 24/7 eye pencil in Perversion along lashline and on waterline
Sugarpill pressed eyeshadow in Bulletproof
Inglot eyeshadow #113R to help blending
Sugarpill pressed eyeshadow in Love+ to blend out lashline
Sugarpill pressed eyeshadow in Flamepoint inner lashline

Tear duct
Urban Decay 24/7 eye pencil in Perversion
Sugarpill pressed eyeshadow in Bulletproof
Revlon Luxurious Color Diamond dust in Night Sky and inner corner of lid

Adhesive
Fyrinnae Pixy Epoxy

Brows
Benefit Brow zings in Light
Benefit Speed brow

Lashes
M.A.C Opulash mascara in Optimum Black

Lips
M.A.C Prep+Prime lip base
M.A.C Lip pencil in Nightmoth to line along bottom lip and corners
M.A.C Lip pencil in Cherry to fill in lips
Lime Crime Velvetine in Red Velvet outer perimeter of lips
Lime Crime Velvetine in Suedeberry centre of lips

Face
M.A.C Prep+Prime Vibrancy eye cream
Maybelline New Instant Age Rewind Eraser dark circles in 20 Light
Benefit Pore-fessional balm
Garnier BB cream Miracle Skin Perfecter for Combination to Oily skin in Light
M.A.C Prep+Prime Transparent finishing powder

Cheeks 
Sugarpill pressed eyeshadow in Tako as cheek highlight with a bit of 
M.A.C Extra Dimension skin finish in Whisper of Gilt and also cupid's bow highlight 
M.A.C Pro powder blush in Cantaloupe on cheeks
Sugarpill pressed eyeshadow in Love+ along cheek bones
Sugarpill pressed eyeshadow in Flamepoint on apples of cheeks


Brushes
Sigma brushes: PE=Performance Eyes kit. 

Eyes
Sigma E21 PE Smudge for base and lower lid
Sigma E25 Blending for crease and lower lid
Sigma E36 PE Blending for crease and lower lid
Sigma E47 PE Shader crease for crease
Japonesque Concealer brush for glitter
Sigma E50 Large Fluff for brow highlight
Sigma E46 PE Shader inner corner for tear duct highlight and lid

Face
M.A.C 224 setting powder for concealer under eyes
Sigma F82 MrB Round kabuki for foundation
Sigma F30 MrB Large powder
Hakuhodo S113 highlight for cheek highlight
Napoleon Perdis 20b Reflective contour brush for blush
Japonesque Lip brush for lips


Disclaimer: Affiliate links contained in this post

Friday, 23 May 2014

Review: Born Pretty 3D Nail Art Roses

I received these beautiful roses from Born Pretty Store and wanted to share a review and a few manicures with you.

I was contacted by a lovely lady named Cynthia from the Born Pretty Store about reviewing some products. As I have bought some nail art items from them before, and had a good experience, I thought I'd take the chance to try some more of their wares to review/use on my blog and YouTube channel. All the opinions given are without pressure from the company and are my own.
I totally recommend the Born Pretty Store embellishments and suggest you check them out here! And to save on pretty things for your fingers, I have a code for 10% off at Born Pretty, so just click on this affiliate linhttp://bit.ly/ihBHUJ and type in "MIHW10" at checkout on any order!

Nail tutorials where I have used these roses are Golden Leopard Nail Tutorial & a future nail tutorial with pin stripes which I will update here when it comes out.

Feel free to click on the photos below for better quality and more accurate colour.

Enjoy!

Video Review


I received 5 red roses and 5 black roses. The listing for these babies is "5pcs 3D Nail Art Sticker Sweet Color Rose Flower Nail Decoration" and they come under numbers of which the black are #10 & the red ones are #12. At the time I got these the price was $1.58 but at the moment they are on sale for USD$0.99 and I am totally going to pick up some more of them.
Born Pretty Store has free international shipping or you can choose to have your items faster and pay a small amount for shipping depending on where you are in the world. I don't mind waiting and opt for free shipping on the items form Born Pretty cause they are so cheap and I wouldn't want to ruin the economy of the order by adding more shipping than the product cost.
The roses stick off the nail with a raised profile of roughly 0.5cm and gave a diameter of 1cm, however aren't too large on small nail beds or short nails to get in the way of the design it overshadow the nail itself. 
Pros

-Spectacular addition to a special manicure.

-Amazing for vintage or pin-up style nails.

-Gorgeous metallic finish. I love the red tone and the black ones are fantastic too.

-Come in different colours to suit your taste and style.

-Shiny finish brings light and dimension to the rose structure so you can see the petals nicely.
-Can look elegant or flashy depending on how you style the rest of your manicure.

-They can bring a subtle sprinkle of zest by adding a single rose to a manicure or go all out and decorate ever nail with these fabulous pieces. 
-Stay adhered well with nail glue. 

-They have a decent sized surface on the bottom of the flower that makes it easy to place them on your nail and keep then there with your glue of choice.

-The fine delicate metal looks dainty and not chunky. It's very light weight and my fingers weren't hindered by the sweet flowers.
Cons
-Great for special occasions but not every day wear.

-Sit up off the nail and can get caught on hair or loose threads on clothes.


-Need special care as all 3D Nail art does. If you are doing gardening than this is really not the style for you and if you work a lot with your hands these won't last very long but for a special occasion they are awesome.

-They have sharp edges so can scratch you if you run them along your skin.

Conclusion

I honestly love these roses and will use them again and buy some more for myself. They come in a variety of colours as seen below and I am endeared by many of them.
The roses are delicate so can be squashed or damaged if you're not careful, as in if you sit on your hands or bash them against something. However, as they are malleable you can bend them back into shape if they aren't broken. I never managed to break one, even though I did actually accidentally sat on my hand 😜 The rose did come off but I was able to nudge it back into shape and it looked good as new.
I didn't wear them to bed as I didn't want to wake up with one embedded in my butt or something like that and I suggest you do the same cause as I mentioned they are relatively sharp. I removed them with an orange-wood stick before going off to bed but just using gentle leverage.

I managed to use each set of roses twice and maybe they can get up to three uses if you take care of them, however it could be less as they can be damaged during wear. They are definitely perfect for a special occasion when you need that extra something to put your nails over the top. 
I have created a couple of different manicures around these roses.
See the blog post where I create the nails above called Golden Leopard Nail Tutorial 

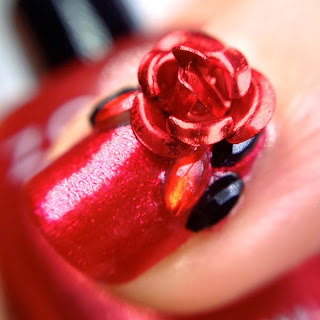
For the other red and black nails I added some elliptical rhinestones also from Born Pretty Store which doubled as petals for this look and are a lovely way to add glitz while changing it up from the standard shape. The hex glitter on the thumb accent nail was placed by hand (I may do a tutorial on this method some time) and it makes for a polka dot effect that is in playful contrast to the stripes.

Click here for the blog post for these nails with more information.

I totally recommend the Born Pretty Store embellishments and suggest you check them out here! And to save on pretty things for your fingers, I have a code for 10% off at Born Pretty, so just click on this affiliate linhttp://bit.ly/ihBHUJ and type in "MIHW10" at checkout on any order!


Disclaimer: Affiliate links contained in this post.

Sunday, 18 May 2014

Darks & DuoChromes Lip Art Tutorial ft Eye Kandy & Inglot

I wanted to play with some duo-chromatic shadows, and I love my Eye Kandy Cotton Candy glitter which is a pink glitter that reflects blue, so I decided to use it in a lip look and give it a dark base to bring out the blue tones. 

I went with my standard black lipstick Portland Black Lipstick Company Black lipstick and neatened up the edged with NYX Black Berry lip liner then patted on the Eye Kandy glitter fading it out towards the edge of the lips. I added a cool Inglot AMC lip gloss in #541, that is a blue/violet tone on top.

The glitter lip looks great on it's own before the gloss and even though the gloss adds more brightness to the blue it is problematic for longevity of the lip. If you want a long wearing lip, I would forego the gloss because the formula eats up the lipstick quite a bit.

This is definitely a lip that I would love to wear often cause the darkness and the bright blue caused by the pink glitter is so fun to create!

You can check out the matching Darks & Duochromes eye makeup here.

And if you dig on bright metallic pigments and smooth easy blendable matte shadows check out Sugarpill here.


Products Used

Lips
(Inglot AMC pressed powder #59 for cupid's bow highlight)
M.A.C Prep+Prime Lip
NYX Lip pencil in Black berry to fill in lips
Eye Kandy Sprinkles in Cotton Candy over centre of lips
Inglot AMC lip gloss in #541 over centre of lips 


Brushes
Sigma E70 Medium Angled Shading brush for glitter
OM She Small eye shadow brush for gloss

Here's the video for the eye makeup.

Video Tutorial


Disclaimer: Affiliate link contained in post.

Monday, 12 May 2014

Darks & DuoChromes Eye Tutorial ft Sugarpill

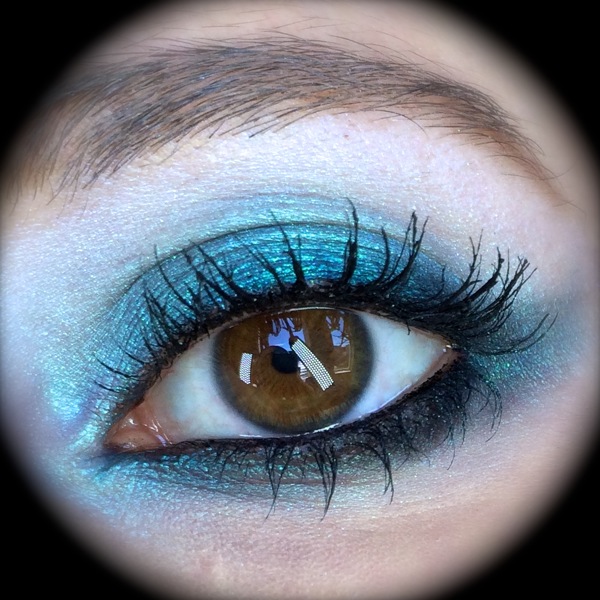
I wanted to play with some duo-chromatic shadows, so I eyed one of the most enchanting loose shadows from Sugarpill, Lumi and my favourite MAC shadow, Vellum and combined them into a simple yet effective eye look.

I used Urban Decay perversion eye pencil to create a dark base in a smudged eyeliner shape for the Lumi to reflect over and added some Sugarpill Bulletproof in the outer corner and the lower lashline for some darkness. 

I created these eyes mainly to go with the matching lip look which will be out soon...

And if you dig on awesome loose pigments and smooth easy blendable matte shadows check out Sugarpill here.

Enjoy!


Makeup
Products Used
Eyelid Primer
Two Faced Shadow insurance 

Lid
NYX Jumbo Eye Pencil in Milk upper part lid
Urban Decay 24/7 eye pencil in Perversion along lashline, smudge out
Sugarpill Chromalust loose Eyeshadow in Lumi over lid up to crease

Brow bone
M.A.C eye shadow in Vellum

Lower lid
Inglot matte gel eyeliner in #77 on waterline, tightline and smudged along outer 2/3 of lashline
Sugarpill pressed eyeshadow in Bulletproof
Sugarpill Chromalust loose Eyeshadow in Lumi on tear duct and along inner 1/3 of lashline then to smudge out lashline 

Eyeliner
Sugarpill pressed eyeshadow in Bulletproof blended outer 1/3 of lashline 

Brows
Revlon ColorStay Brow liner in Blonde
Benefit Gimme brow

Lashes
L’Oréal Telescopic Lashes in Extra Black

Face
Maybelline Age rewind concealer Brightener
Bourjois Healthy mix Concealer in 51 Light Vanilla
Bourjois Healthy mix Foundation in 51 Vanilla
Purely Cosmetics Diamond Perfect Finish powder

Cheeks 
Inglot AMC Pressed Powder #59
Sleek Candy Collection Sweet Cheecks blush in Dolly mix

Urban Decay All Nighter Makeup Setting Spray

Brushes
For Simga brushes MrB= Mr Bunny Kit

Eyes
Sigma MrB E30 Pencil brush
Sigma MrB E55 Eye Shading brush
Sedona Lace EB09 Blending brush
Sigma MrB E05 Eyeliner brush

Face
Sigma P82 Precision Round brush 
Sigma F82 Round Kabuki brush for foundation
M.A.C 224 setting powder for concealer under eyes
Sigma MrB E30 Large Powder brush for setting powder
M.A.C 116 for cheek highlight
Napoleon Perdis 20b Relective contour brush for blush


Disclaimer: Affiliate links contained in this post.

Monday, 5 May 2014

Golden Leopard Nail Tutorial ft FUN Lacquer & Born Pretty Roses

I have a nail tutorial featuring some pretty polishes from F.U.N Lacquer and these awesome black 3D Roses that I received from the Born Pretty Store. 

In this tutorial I show you different ways to use glitter top coats to create a leopard design and how to place hex glitter with dotting tool to make a glittery polka dot effect.

To keep with the leopard or cheetah theme I used golden polishes from F.U.N Lacquer such as Belle for a base colour and Gold Mark for the spots with gold and black acrylic paint for the leopard details and I added some gold studs from Born Pretty for even more golden gleam.
I have a review on these Born Pretty Roses here coming soon.

I totally recommend the Born Pretty Store embellishments and suggest you check them out here! And to save on pretty things for your fingers, I have a code for 10% off at Born Pretty, so just click on this linhttp://bit.ly/ihBHUJ and type in "MIHW10" at checkout on any order!

Feel free to click on the photos below for better quality and more accurate colour.

Enjoy!

Video Tutorial


Products Used

Nails
F.U.N Lacquer Belle over nails
F.U.N Lacquer Gold Mark for spots
Black acrylic paint for leopard details

Embellishments
Born Pretty Flower Nail Art Decoration 3D Black Roses at cuticle 

Ring Accent nail
Glitter Gal Serpent Black
Gold acrylic paint for leopard details

Thumb Accent nail
Glitter Gal Serpent Black
3x3mm Square gold studs from Born Pretty Store
Gold Hex Glitter Pieces from Born Pretty Store

Tools
Dotting Tool for details
Scraperfect Embellie Gellie to pick up embellishments

Disclaimer: Affiliate link contained in this post.