Tuesday 29 October 2013

Spook me in the Dark Nails!

A Glow in the Dark Spider web Manicure perfect for Halloween!

Here is a scheme that captures Halloween on the nails. Not only is it a fun and cute cartoon spider design that will look great at your Halloween party, but it will also rock when the lights go out!

This is my first try at doing spider web nails and although it's not perfect I think it turned out pretty cute. And the best tip I could give is use a striping brush or very thin nail art brush for best results. I used a detail brush and it was hard to get the spider web lines fine enough, but it worked well for the spiders themselves.

I got my glow in the dark polishes from Born Pretty Store and you can check them out here! And for an extra special something for you, use the code "MIHW10" at checkout for 10% off your whole order if you purchase anything from Born Pretty!

Enjoy!


Tutorial

  1. Apply Base coat and or growth strengthener to protect your nails and keep them healthy.
  2. Apply 2 coats of white polish over all your nails.
  3. Apply a horizontal striped gradient of orange, yellow and green Glow in the Dark Neon polish over nails (except accent nails) using the sponge method.
  4. Build up coats using the sponge until desired opacity is reached.
  5. Apply Green Glow in the Dark Neon polish to thumb.
  6. Apply Yellow Glow in the Dark Neon polish to ring finger.
  7. Use a Nail Art brush to paint the spider web with Black Acrylic Paint on nails.
  8. Use a Nail Art brush to create the cartoon Spiders with Black Acrylic Paint on accent nails. 
  9. Use a dotting tool with a white polish and make the large cute eyes of the Spiders.
  10. Use a dotting tool with Glow in the Dark Neon polish to colour Spider's eyes.
  11. Apply 1 coat each of the Flaky Topcoat polishes to all nails.
  12. Apply a fast drying top coat to all nails.
  13. Done!


Products Used

Base coat
OPI Nail Envy
Essie Grow Stronger

First layer (White Base for all nails)
Sally Hansen Xtreme Hard as Nails White On

Second layer (Gradient)
Candy Colors Fluorescent Neon Luminous Nail Art Polish Glow In Dark Varnish 7ML Orange #16
Candy Colors Fluorescent Neon Luminous Nail Art Polish Glow In Dark Varnish 7ML Yellow #2
Candy Colors Fluorescent Neon Luminous Nail Art Polish Glow In Dark Varnish 7ML Green #4

Accent nail (ring finger)
Candy Colors Fluorescent Neon Luminous Nail Art Polish Glow In Dark Varnish 7ML Yellow #2 (2 coats)

Accent nail (thumb)
Candy Colors Fluorescent Neon Luminous Nail Art Polish Glow In Dark Varnish 7ML Green #4 (2 coats)

Spider design
Black Acrylic Paint - for spider web and Spiders
Sally Hansen Xtreme Hard as Nails White On - for Eyes
Candy Colors Fluorescent Neon Luminous Nail Art Polish Glow In Dark Varnish 7ML Pink #13 - for Eyes
Candy Colors Fluorescent Neon Luminous Nail Art Polish Glow In Dark Varnish 7ML Orange #16 - for Eyes

Third Layer
Finger Paints Special Effects Flaky Polish Asylum (1 coat)
Finger Paints Special Effects Flaky Polish Motley (1 coat)

Top coat
Seche Vite dry fast top coat


Disclaimer: Affiliate links are contained in this post.

Sunday 27 October 2013

Tutorial: Love + @#$%! (Makeup from Red & Black Ombre Lip Art)

Today I'm sharing the tutorial for this bad ass red makeup starring Sugarpill's Love+. I whipped up a smoky eye with Sugarpill red eyeshadows and black winged liner as seen in my "Red & Black Ombre Lips" video, which you can check out here or below.

You can customise this makeup to your own personal taste. For instance, you don't have to make the eyeshadow as bright or as blown out as I have and if it tickles your fancy, pair it with neutral lips.

If you like what you see, feel free to visit my YouTube Channel, maybe hit subscribe, like the video and leave a comment. I won't bite...unless the mood strikes me! ;-P

If you want to check out the post for Kiss and Mötley Crüe gig OOTD and Makeup from earlier this year, click here. And the original post for the Kiss and Mötley Crüe gig Lip Art is here.


If you love a fabulous matte red shadow, sparkly raspberry or a sexy matte black like I do, check out Sugarpill here, along with many other pigments and eyeshadows!


Enjoy!


Video Tutorial


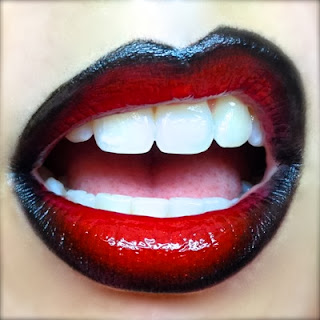
Here are the lips I created and you can check out the Lip art tutorial below.


Products Used

Eyelid primer
Two Faced Shadow insurance

Lid
NYX Jumbo eye pencil in Milk
Sugarpill pressed eyeshadow in Love+

Crease
Inglot eyeshadow #111R (middle & darkest shade) as transition shadow
Sugarpill pressed eyeshadow in @#$%! Limited edition to blend out lid

Brow highlight
Inglot eyeshadow #111R (lightest shade)

Lower lid
Urban Decay 24/7 eye pencil in Perversion along lashline
Sugarpill pressed eyeshadow in Bulletproof along lashline
Sugarpill pressed eyeshadow in @#$%! Limited edition to blend out
Maybelline Lasting Drama gel eyeliner in Blackest Black on waterline

Tear duct
NYX Jumbo eye pencil in Milk
Sugarpill pressed eyeshadow in Tako

Eyeliner
Urban Decay 24/7 Liquid eyeliner in perversion

Brows
Revlon ColorStay Eyebrow liner in Blonde
Benefit Speed brow

Lashes
M.A.C Opulash mascara in Optimum Black
Rimmel Extra Super Lash Curved Brush mascara

Lips
M.A.C Lip Conditioner
M.A.C Prep+Prime Lip
NYX Lip pencil in Black berry to define edges of lips
M.A.C Lip pencil in Cherry on centre of lips
Portland Black Lipstick Company Black on perimeter of lips
OCC Lip tar in NSFW on centre of lips
Lime Crime Carousel gloss in Candy Apple on centre of lips

Face
M.A.C Prep+Prime Vibrancy Eye Primer
Bourjois Healthy mix Correcting Concealer in 51 Light Radiance
Benefit Pore-fessional primer
Bourjois Healthy mix Foundation in 51 Light Vanilla
Purely Cosmetics Diamond Perfect Finish

Cheeks 
M.A.C Extra Dimension skin finish in Whisper of Gilt and also cupid's bow highlight
M.A.C Pro powder blush in Cantaloupe for blush


Brushes
Sigma brushes: PE=Performance Eyes kit. MrB=Mr Bunny kit. 

Eyes
Sigma F70 Concealer for lid
Sigma E46 PE Inner Corner for tear duct
Sigma E70 Medium Angled Shading for crease and brow highlight
Sedona Lace EB 15 for blending out crease
Sigma E20 Short Shader for lower lid
Maybelline eyeliner brush for waterline

Lips
Sedona Lace LB 25 for outer black
Japonesque Lip brush for centre red

Face
Sigma P82 Precision Round for concealer
M.A.C 224 setting powder for concealer under eyes
Sigma F30 MrB Large Powder for setting powder
Hakuhodo S113 highlight for cheek highlight
Napoleon Perdis 20b Reflective contour brush for blush


Disclaimer: Affiliate links are contained in this post.

Friday 25 October 2013

Fine French Crystal Nails

A Sparkly twist on a Classic French Manicure!

If you are bored of your standard french tip manicure and want something to jazz it up a bit, then try using these colourful crystals to add some pizazz and pep!

Get all the embellishments and decorations I used here from the Born Pretty store and use the code MIHW10 for 10% off your whole order!

Enjoy!


Tutorial
  1. Apply Base coat and growth stimulater to protect your nails and keep them healthy.
  2. Apply 3 coats of pink iridescent polish over all your nails.
  3. Apply 1 coat of white polish freehand along the tip of the nail in a french tip shape. (Don't worry about being perfectly neat.)
  4. Apply 1 coat of pink holographic glitter tips of nails and all over ring accent nail.
  5. Apply 1 coat of fine holographic glitter tips of nails and all over ring accent nail.
  6. Apply a fast drying top coat to ring accent nail and add 2mm crystals from Born Pretty Store all over nail.
  7. Apply a fast drying top coat to all nails and add 2mm crystals from Born Pretty Store along French tip separation line.
  8. Done!
Products Used


Base coat
OPI Nail Envy
Zoya Anchor base coat

First layer
OM SHE Nail Colour Illusion (3 coats)

Second layer (French Tip)
Sally Hansen Hard as Nails Xtreme wear White On (1 coat)
OPI Teenage dream (1 coat)
Sally Hansen Hard as Nails Xtreme wear Disco ball (1 coat)
Bornpretty Colorful Crystal 2mm Rhinestones SS10 from the Born Pretty Store along French tip separation line

Accent nail (Ring finger)
OM SHE Nail Colour Illusion (3 coats)
Sally Hansen Hard as Nails Xtreme wear Disco ball (1 coat)
OPI Teenage dream (1 coat)
Bornpretty Colorful Crystal Rhinestones SS10 from the Born Pretty Store all over nail

Top coat
Seche Vite dry fast top coat


Disclaimer: Affiliate links are contained in this post.

Saturday 19 October 2013

OOTD Double Shot - "Let the Fireworks Begin!" + "Mental Leopard"

I put together a couple of outfits with some new delicious items I got recently and wanted to share some fun and flair.

Check out the video with the Fireworks Leggings, Cherry Twist Self-Tied Bow, and the second outfit with Unif Leopard Idol dress and also the Romwe Studded Leggings. 

Feel free to visit my YouTube Channel here and maybe subscribe if you like what you see.

If you're interested, the makeup details are at the bottom of this post.

Enjoy!

OOTD Video


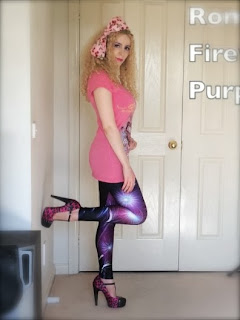
I'm really smitten with these fabulous Fireworks leggings that I won in a Letzmakeup YouTube competition sponsored by Romwe. Thank you to Shiv for hosting the giveaway and Romwe for supplying my choice of any of their lovely leggings. These ones are so colourful and comfortable and look really great with a variety of outfits.

Then there's the gorgeous head scarf from CheeseCake Dolls on Etsy. Wow, I love this accessory and have been wearing it heaps and getting lots of compliments on it too. I feel very cutesy and sexy wearing this bow, in a pin-up sort of way. 

Outfit

Firework Print Purple Leggings from Romwe.com
Ed Hardy Love Kills Slowly V-neck Tunic T-shirt in Pink
Betsey Johnson Morticia Platform Pumps in Fuchsia


Romwe Firework Print Purple Leggings


Ed Hardy Love Kills Slowly V-neck Tunic T-shirt


Accessories

Dagger and Heart Silver necklace from William Lewellyn Griffiths metalcouture.com
Pink Safire Silver bangle from Prouds (Gift)
Swiss Blue Topaz solitaire ring in Sterling Silver from Amazon
Amethyst and diamond White gold ring
Cherry Twist Self-Tied Head Scarf by CheeseCake Dolls on Etsy


CheeseCake Dolls Cherry Twist Self-Tied Head Scarf


Makeup
Products Used

Eyelid primer
Urban Decay Primer Potion

Lid
Maybelline ColorTatoo in Painted Purple
Inglot eyeshadow #441 over lid
Urban Decay deluxe eyeshadow in Fishnet on centre of lid
Inglot eyeshadow #439 on outer corner
Eye Kandy Sprinkle in Jelly bean (Sugar)

Glitter Adhesive
Eye Kandy Liquid Sugar

Crease
Inglot eyeshadow #101R transition shade
Sugarpill Chromalust in PaperDoll
Inglot eyeshadow #111R
Sleek Acid palette (Purple shade)

Brow highlight
Inglot eyeshadow #101R (lightest shade)
M.A.C eye shadow in Vellum at peak of brow

Lower lid
Urban Decay 24/7 pencil in Ransom along lashline
Inglot eyeshadow #441 along lashline
Urban Decay deluxe eyeshadow in Fishnet along lashline
Inglot matte gel eyeliner in #76 on waterline
Sugarpill pressed eyeshadow in Bulletproof along 

Tear Duct
NYX Jumbo Eye Pencil in Milk
M.A.C eye shadow in Vellum

Brows
Revlon ColorStay Eyebrow Liner in Blonde
Benefit Speed brow

Eyeliner
Urban Decay 24/7 Liquid eyeliner in Perversion

Lashes
L'Oreal Telescopic Mascara in Carbon Black

Lips
M.A.C Lip Conditioner
NYX Lip pencil in Hot Pink to outline lips
Coloured Raine Uncensored lips in Intimidate over lips
M.A.C Dazzleglass in Funtabulous

Face
Maybelline New Instant Age Rewind Eraser dark circles in 20 Light
Benefit Pore-fessional primer
M.A.C Face and body in C1
Purely Cosmetics Diamond Perfect Finish

Cheeks
M.A.C Extra Dimension skin finish in Whisper of Gilt
Benefit Powder blush in Thrrrob along cheeks
Sleek Candy Collection blush in Candy Floss on apples of cheeks


Monday 14 October 2013

Glowing Violet Nails + Review

Here is another nail design for you with some AMAZING Glow in the Dark Neon polishes and cute rhinestones that Born Pretty gifted me. I'll have a blog post about the items coming soon.

I created a manicure that is great for short nails and still has some sparkle and attention! The embellishments are a good size so they don't make a short nail look too stubby and let the nail polish shine through the design, literally in the case of this luminescent polish!


I got these amazing Glow in the Dark Polishes and rhinestones from Born Pretty Store and if you desire the fun colourful look, click here and use the coupon code MIHW10 at checkout for 10% discount off your whole order.


I have bought many items from Born Pretty before and also have received free items to review/use on my blog. All the opinions given are without pressure from the company and are my own.

Feel free to click on the photos below for better quality and more accurate colour. And the tutorial and product list are at the end of this post.


Enjoy!


I usually use a white base coat under neon polishes to enhance their pigmentation and save polish so opacity is reached with fewer coats. For this manicure I didn't, because I wanted the purple to be a more pastel neon lilac this time. I love the way it came out, it's bright but soft at the same time.


I can't believe how fantastic these glow in the dark nail polishes are and how bright they shine after you "charge" them up by holding your nails close to a light source. I really love the bright colours of these lacquers in natural light but when the lights go out they really fascinate! It makes it hard to get to sleep at night cause I'm always staring at my tips!


All these photos were taken by holding my nails up to a light then turning all the lights off and quickly taking the photo.


Here are some macro shots taken with the ōllo clip to show the embellishments up close and personal. 


Tutorial
  1. Apply Base coat and growth stimulater to protect your nails and keep them healthy.
  2. Apply 3 coats of Glow in the Dark Neon Purple polish over all your nails except the accent nails.
  3. Apply 3 coats of Glow in the Dark Neon Pink polish over accent nails.
  4. Apply 1 coat of top coat over all nails. (Note: do one nail at a time.)
  5. Quickly place 3mm Pink Resin Rhinestone in centre of nail at cuticle.
  6. Place 2mm Purple Rhinestones either side of pink ones.
  7. Add 2mm Purple Elliptic Rhinestones on ring accent nail.
  8. Place 3mm Purple Metal Studs along centre of thumb accent nail.
  9. Add 2mm Purple Elliptic Rhinestones on either side of studs.
  10. Apply a fast drying top coat over all nails.
  11. Done!
  12. Take pictures in the dark! ;-D


Products Used

Base coat
OPI Nail Envy
Essie Grow Stronger

First layer
Candy Colors Fluorescent Neon Luminous Nail Art Polish Glow In Dark Varnish #9 (3 coats) froBorn Pretty Store

Second layer
3mm Resin Rhinestone Acrylic UV Gel Nail Art #6 (Pink) froBorn Pretty Store
2mm Colorful Rhinestone Acrylic UV Gel Nail Art - #9 (Purple) froBorn Pretty Store

Accent nail (Ring Nail)
Candy Colors Fluorescent Neon Luminous Nail Art Polish Glow In Dark Varnish #11 (3 coats) froBorn Pretty Store
3mm Resin Rhinestone Acrylic UV Gel Nail Art #6 (Pink) froBorn Pretty Store
2mm Colorful Rhinestone Acrylic UV Gel Nail Art - #9 (Purple) from Born Pretty Store
12 Colors Elliptic Shape Rhinestones Nail Glitter Art (Purple) from Born Pretty Store

Accent nail (Thumb Nail)
Candy Colors Fluorescent Neon Luminous Nail Art Polish Glow In Dark Varnish #11 (3 coats) from Born Pretty Store
3mm Purple square studs from dollarnailart.com
12 Colors Elliptic Shape Rhinestones Nail Glitter Art (Purple) from Born Pretty Store

Top coat
Seche Vite dry fast top coat


Disclaimer: Affiliate links are contained in this post.

Monday 7 October 2013

Lip Art Tutorial: Red & Black Ombre Lips

This is the lip look I created for the Kiss & Mötley Crüe Gig and has sort of become my logo about the inter-webs. 

I wanted a massively dramatic red and black lip to go with the glam look I banged out for the occasion. If you want to check out the post for Kiss and Mötley Crüe gig OOTD and Makeup from earlier this year, click here. And the original post for the Kiss and Mötley Crüe gig Lip Art is here

I finally created the Lip Art tutorial and got my YouTube Channel rolling. So here are the tips, tricks and secret nuances on how I create my Red & Black Ombre Lips.

Enjoy!

Video Tutorial


Products Used

Lips
M.A.C Lip Conditioner
M.A.C Prep+Prime Lip
NYX Lip pencil in Black berry to define edges of lips
M.A.C Lip pencil in Cherry on centre of lips
Portland Black Lipstick Company Black on perimeter of lips
OCC Lip tar in NSFW on centre of lips
Lime Crime Carousel gloss in Candy Apple on centre of lips

Brushes
Sedona Lace LB 25 for outer black
Japonesque Lip brush for centre red