Wednesday, 27 November 2013

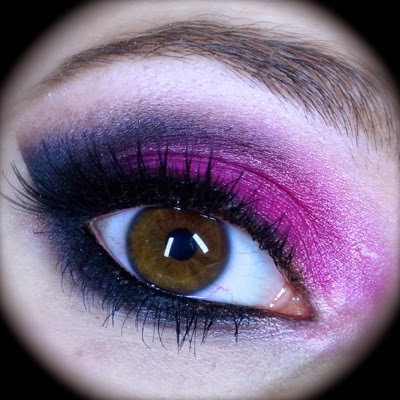
Fancy Night out FOTD & OOTD

I was going out to a special Truffle dinner hosted by Philippe Mouchel at PM24 and wanted to add a little colour to the little black dress I was wearing.

Since my shoes and handbag (the only matching set I own ;-p) were hot pink, I decided to make that the star colour in my makeup. I used Sugarpill Dollipop on the lid over MAC paintstick in Processed Magenta and combined it with some the Sleek Candy Collection palette. Then for the lips, I applied my favourite pink lipstick of the moment, Coloured Raine Intimidate with a little MAC Nightmoth around the edges for definition.

Then for the black portion I blended Bulletproof, the matte black shade also from Sugarpill, over a base of Inglot matte gel eyeliner in #77 for extra depth. That gel liner works magnificently on the waterline and stays on so long it's amazing!


If you love an opaque, deep dark black or a matte hot pink as much as I do, check out Sugarpill here, along with many other gorgeous bright shadows!


Enjoy!


Outfit
Pilgrim Australia Black Bandage dress from Review
Hugo Boss Calmona jacket
Ambra 200 denier opaque Black stockings
Karen Millen Hot Pink Leopard print handbag and heels
Solid silver collar from Master Jewellers Australia


Makeup

Products Used

Eyelid primer
Two Faced Shadow insurance

Lid
M.A.C Paintstick in Processed Magenta inner 2/3 of lid
Inglot matte gel eyeliner #77 outer 1/3 of lid
Sugarpill pressed eyeshadow in Dollipop inner 2/3 of lid
Sleek Candy Collection palette eyeshadow in Aniseed inner 2/3 of lid
Sugarpill pressed eyeshadow in Bulletproof outer 1/3 of lid

Crease
Inglot eyeshadow #111R (middle & darkest shade) as transition shadow
Sugarpill pressed eyeshadow in Bulletproof

Brow highlight
Inglot eyeshadow #111R (lightest shade)

Lower lid
Inglot matte gel eyeliner #77 along lashline and on waterline
Sugarpill pressed eyeshadow in Bulletproof along lashline

Tear duct
NYX Jumbo eye pencil in Milk
Urban Decay Eyeshadow in Sin

Eyeliner
Inglot matte gel eyeliner #77 smudged out with
Sugarpill pressed eyeshadow in Bulletproof

Brows
Revlon ColorStay Eyebrow Liner in Blonde
Benefit Speed brow

Lashes
M.A.C Opulash mascara in Optimum Black
Rimmel Extra Super Lash Curved Brush mascara 
eBay lashes cat eye winged ones cut in half

Lips
M.A.C Lip Conditioner
M.A.C Prep+Prime Lip
NYX Lip pencil in Hot Pink to fill in lips
M.A.C Lip pencil in Nightmoth to outline
Coloured Raine Uncensored Lipstick Lipstick Intimidate

Face
M.A.C Prep+Prime Vibrancy Eye Primer
Bourjois Healthy mix Correcting Concealer in 51 Light Radiance
Benefit Pore-fessional primer
Bourjois Healthy mix Foundation in 51 Light Vanilla
Purely Cosmetics Diamond Perfect Finish

Cheeks 
M.A.C Extra Dimension skin finish in Whisper of Gilt
M.A.C Mineralised Blush in Gentle


Disclaimer: Affiliate links are contained in this post.

Tuesday, 26 November 2013

Hollow Heart Cutting Sick & Struttin' my Shit - Bloopers

Ok, this is some super silly shit! I had some extra footage from my Hollow Heart Lookbook and I decided to make a video of outtakes & shenanigans. Yeah, it’s self indulgent, but I had so much fun recording the video and I couldn’t help but share a look behind the curtain.

The actual Lookbook video is here and the blog post for it is hereif you want to see where I bought all the items and the makeup stuff details.

Enjoy!

Outtakes Video


Saturday, 16 November 2013

Lookbook: Hollow Heart Ft. Romwe

I've got a killer lookbook to share with you based around this "Heart" black hollow T-shirt I got from Romwe. I bought it a while ago and thought it would look great with some of my punk and gothic styling pieces and work really well for gig/stage wear.

In the same haul I also bought the anomalous hem red skirt (some may call it a high-low skirt, but I just call it a mullet skirt) and I also paired the outfits with my tripp tartan skirt, Jeffrey Campbell the Spike Litas and studs a plenty!

Check out my lookbook video below including some shots with my beloved bass guitar "Adolf" and some regular old rocking out or see it on YouTube here.

Feel free to visit my YouTube Channel here and maybe subscribe if you like what you see.

If you're interested, the makeup details are at the bottom of this post.


If you love a sexy, goth black as much as I do, check out Sugarpill here, along with many other gorgeous bright shadows & pigments!


Enjoy!


Lookbook Video
 

I was dancing around to Halestorm & Cradle of Filth if you are wondering.


Outfits

Hollow Heart of Punk

"Heart" Black Hollow T-shirt from Romwe
Tripp Tartan skirt Style: IB2042 from Victorian Gothic
Mental Pyramid Rivets Leggings from romwe.com
Studded Biker-style Leather jacket from Siricco
Jeffrey Campbell The Spike Lita Shoe in Black and Silver from Karmaloop

Accessories

Custom Leather Collar with from CollarFactory.com
Punk Samrt Black Bracelet from romwe.com


Hollow Heart of Rock

"Heart" Black Hollow T-shirt from Romwe
Short Stories Corset from Myer
Anomalous Hem Red Skirt from Romwe
Mental Pyramid Rivets Leggings from romwe.com
Custom Leather vest
Pleaser Electra 2028 Knee High Flame boots demo Clubwear Australia

Accessories
Custom Leather Collar with from CollarFactory.com
Custom Leather wrist cuff with from CollarFactory.com
Punk Samrt Black Bracelet from romwe.com


Makeup
Products Used

Eyelid primer
Two Faced Shadow Insurance

Lid
Inglot matte gel eyeliner in #77 as base
Sugarpill pressed eyeshadow in Bulletproof over lid, blended up into crease

Brow highlight
Inglot eyeshadow #101R (lightest shade)

Lower lid
Inglot matte gel eyeliner in #77 along lashline, on tightline & waterline
Sugarpill pressed eyeshadow in Bulletproof along lashline

Brows
Revlon ColorStay Eyebrow Liner in Blonde
Benefit Speed brow

Lashes
L'Oreal Telescopic Mascara in Carbon Black

Lips
M.A.C Lip Conditioner
M.A.C Prep+Prime Lip base
MUFE Aqua Lip Liner in 8C to fill in lips
Lime Crime Velvetine in Red Velvet over lips
NYX Slim Lip pencil in Black Berry to outline & fill in corners of lips
Portland Black Lipstick Company Black outer perimeter of lips

Face
Maybelline New Instant Age Rewind Eraser dark circles in 20 Light
Benefit Pore-fessional primer
Bourjois Healthy Mix Foundation in 51 Light Vanilla
Purely Cosmetics Diamond Perfect Finish

Cheeks
M.A.C Extra Dimension skin finish in Whisper of Gilt
M.A.C Pro Powder blush in Cantaloupe

Some shots of me and Adolf!


Disclaimer: I am not affiliated with Romwe in any way and I purchased all the clothing myself.

Note: Affiliated links are contained in this post for makeup.

Friday, 8 November 2013

Glowing Acid Wash Nails

I thought I'd have a go at an acid wash design adding some funk with neon polishes and totally rad glow in the dark awesomeness! I saw this cool effect in a MissJenFABULOUS Tutorial and loved the 80s style of the manicure.

I used the awesome Born Pretty Store Candy Colors Luminous polish layered over Color club Jackie Oh! to get a juicy coral/hot pink shade and Sally Hansen White On for the white layer. And I switched it up for a reverse accent nail for extra fun! My boyfriend says they look like candy and now I want to eat them! xp
 

I totally recommend the Born Pretty Store glowing polishes so check them out here! And I have a code for 10% off at Born Pretty so just type in "MIHW10" at checkout on any order!


Also, check out my video tutorial of the Glow in the Dark Acid Wash Nails in action below!
I will never get sick of Glow in the Dark nails!!!

If you like what you see, feel free to visit my YouTube Channel, slap the like or subscribe button, and leave a comment.

Enjoy!


Video Tutorial


Tutorial
  1. Apply Base coat and growth stimulater to protect your nails and keep them healthy.
  2. Apply 2 coats of a coral pink polish over all your nails except the ring accent nail.
  3. Apply 3 coats of a hot pink glow in the dark polish over all your nails except the accent nail.
  4. Apply 2 coats of white polish to the ring accent nail.
  5. Let the polish dry for about 10 minutes.
  6. Apply 1 coat each of the coral pink & the hot pink glow in the dark polish to the accent nail.
  7. Apply 1 coat of white polish over all your nails except the accent nail.
  8. Let the polish dry for 10 minutes then dunk your tips in ice water to speed up the drying process.
  9. After the polish is no longer tacky, use a cotton bud saturated in polish remover to rub off some of the top layer of polish to reveal the colour underneath.
  10. Apply a fast drying top coat to all nails.
  11. Done!

Products Used


Base coat
OPI Nail Envy
Essie Grow Stronger

First layer
Color Club Jackie Oh! (2 coats)
Candy Colors Fluorescent Neon Luminous Nail Art Polish Glow In Dark Varnish #13 (3 coats)

Second Layer
Sally Hansen Hard as Nails Xtreme wear White On (1 coat)

Accent nail
Sally Hansen Hard as Nails Xtreme wear White On (2 coats)
Color Club Jackie Oh! (1 coat)
Candy Colors Fluorescent Neon Luminous Nail Art Polish Glow In Dark Varnish #13 (1 coat)

Top coat
Seche Vite dry Fast Top Coat


Disclaimer: Affiliate links are contained in this post.

Tuesday, 29 October 2013

Spook me in the Dark Nails!

A Glow in the Dark Spider web Manicure perfect for Halloween!

Here is a scheme that captures Halloween on the nails. Not only is it a fun and cute cartoon spider design that will look great at your Halloween party, but it will also rock when the lights go out!

This is my first try at doing spider web nails and although it's not perfect I think it turned out pretty cute. And the best tip I could give is use a striping brush or very thin nail art brush for best results. I used a detail brush and it was hard to get the spider web lines fine enough, but it worked well for the spiders themselves.

I got my glow in the dark polishes from Born Pretty Store and you can check them out here! And for an extra special something for you, use the code "MIHW10" at checkout for 10% off your whole order if you purchase anything from Born Pretty!

Enjoy!


Tutorial

  1. Apply Base coat and or growth strengthener to protect your nails and keep them healthy.
  2. Apply 2 coats of white polish over all your nails.
  3. Apply a horizontal striped gradient of orange, yellow and green Glow in the Dark Neon polish over nails (except accent nails) using the sponge method.
  4. Build up coats using the sponge until desired opacity is reached.
  5. Apply Green Glow in the Dark Neon polish to thumb.
  6. Apply Yellow Glow in the Dark Neon polish to ring finger.
  7. Use a Nail Art brush to paint the spider web with Black Acrylic Paint on nails.
  8. Use a Nail Art brush to create the cartoon Spiders with Black Acrylic Paint on accent nails. 
  9. Use a dotting tool with a white polish and make the large cute eyes of the Spiders.
  10. Use a dotting tool with Glow in the Dark Neon polish to colour Spider's eyes.
  11. Apply 1 coat each of the Flaky Topcoat polishes to all nails.
  12. Apply a fast drying top coat to all nails.
  13. Done!


Products Used

Base coat
OPI Nail Envy
Essie Grow Stronger

First layer (White Base for all nails)
Sally Hansen Xtreme Hard as Nails White On

Second layer (Gradient)
Candy Colors Fluorescent Neon Luminous Nail Art Polish Glow In Dark Varnish 7ML Orange #16
Candy Colors Fluorescent Neon Luminous Nail Art Polish Glow In Dark Varnish 7ML Yellow #2
Candy Colors Fluorescent Neon Luminous Nail Art Polish Glow In Dark Varnish 7ML Green #4

Accent nail (ring finger)
Candy Colors Fluorescent Neon Luminous Nail Art Polish Glow In Dark Varnish 7ML Yellow #2 (2 coats)

Accent nail (thumb)
Candy Colors Fluorescent Neon Luminous Nail Art Polish Glow In Dark Varnish 7ML Green #4 (2 coats)

Spider design
Black Acrylic Paint - for spider web and Spiders
Sally Hansen Xtreme Hard as Nails White On - for Eyes
Candy Colors Fluorescent Neon Luminous Nail Art Polish Glow In Dark Varnish 7ML Pink #13 - for Eyes
Candy Colors Fluorescent Neon Luminous Nail Art Polish Glow In Dark Varnish 7ML Orange #16 - for Eyes

Third Layer
Finger Paints Special Effects Flaky Polish Asylum (1 coat)
Finger Paints Special Effects Flaky Polish Motley (1 coat)

Top coat
Seche Vite dry fast top coat


Disclaimer: Affiliate links are contained in this post.

Sunday, 27 October 2013

Tutorial: Love + @#$%! (Makeup from Red & Black Ombre Lip Art)

Today I'm sharing the tutorial for this bad ass red makeup starring Sugarpill's Love+. I whipped up a smoky eye with Sugarpill red eyeshadows and black winged liner as seen in my "Red & Black Ombre Lips" video, which you can check out here or below.

You can customise this makeup to your own personal taste. For instance, you don't have to make the eyeshadow as bright or as blown out as I have and if it tickles your fancy, pair it with neutral lips.

If you like what you see, feel free to visit my YouTube Channel, maybe hit subscribe, like the video and leave a comment. I won't bite...unless the mood strikes me! ;-P

If you want to check out the post for Kiss and Mötley Crüe gig OOTD and Makeup from earlier this year, click here. And the original post for the Kiss and Mötley Crüe gig Lip Art is here.


If you love a fabulous matte red shadow, sparkly raspberry or a sexy matte black like I do, check out Sugarpill here, along with many other pigments and eyeshadows!


Enjoy!


Video Tutorial


Here are the lips I created and you can check out the Lip art tutorial below.


Products Used

Eyelid primer
Two Faced Shadow insurance

Lid
NYX Jumbo eye pencil in Milk
Sugarpill pressed eyeshadow in Love+

Crease
Inglot eyeshadow #111R (middle & darkest shade) as transition shadow
Sugarpill pressed eyeshadow in @#$%! Limited edition to blend out lid

Brow highlight
Inglot eyeshadow #111R (lightest shade)

Lower lid
Urban Decay 24/7 eye pencil in Perversion along lashline
Sugarpill pressed eyeshadow in Bulletproof along lashline
Sugarpill pressed eyeshadow in @#$%! Limited edition to blend out
Maybelline Lasting Drama gel eyeliner in Blackest Black on waterline

Tear duct
NYX Jumbo eye pencil in Milk
Sugarpill pressed eyeshadow in Tako

Eyeliner
Urban Decay 24/7 Liquid eyeliner in perversion

Brows
Revlon ColorStay Eyebrow liner in Blonde
Benefit Speed brow

Lashes
M.A.C Opulash mascara in Optimum Black
Rimmel Extra Super Lash Curved Brush mascara

Lips
M.A.C Lip Conditioner
M.A.C Prep+Prime Lip
NYX Lip pencil in Black berry to define edges of lips
M.A.C Lip pencil in Cherry on centre of lips
Portland Black Lipstick Company Black on perimeter of lips
OCC Lip tar in NSFW on centre of lips
Lime Crime Carousel gloss in Candy Apple on centre of lips

Face
M.A.C Prep+Prime Vibrancy Eye Primer
Bourjois Healthy mix Correcting Concealer in 51 Light Radiance
Benefit Pore-fessional primer
Bourjois Healthy mix Foundation in 51 Light Vanilla
Purely Cosmetics Diamond Perfect Finish

Cheeks 
M.A.C Extra Dimension skin finish in Whisper of Gilt and also cupid's bow highlight
M.A.C Pro powder blush in Cantaloupe for blush


Brushes
Sigma brushes: PE=Performance Eyes kit. MrB=Mr Bunny kit. 

Eyes
Sigma F70 Concealer for lid
Sigma E46 PE Inner Corner for tear duct
Sigma E70 Medium Angled Shading for crease and brow highlight
Sedona Lace EB 15 for blending out crease
Sigma E20 Short Shader for lower lid
Maybelline eyeliner brush for waterline

Lips
Sedona Lace LB 25 for outer black
Japonesque Lip brush for centre red

Face
Sigma P82 Precision Round for concealer
M.A.C 224 setting powder for concealer under eyes
Sigma F30 MrB Large Powder for setting powder
Hakuhodo S113 highlight for cheek highlight
Napoleon Perdis 20b Reflective contour brush for blush


Disclaimer: Affiliate links are contained in this post.

Friday, 25 October 2013

Fine French Crystal Nails

A Sparkly twist on a Classic French Manicure!

If you are bored of your standard french tip manicure and want something to jazz it up a bit, then try using these colourful crystals to add some pizazz and pep!

Get all the embellishments and decorations I used here from the Born Pretty store and use the code MIHW10 for 10% off your whole order!

Enjoy!


Tutorial
  1. Apply Base coat and growth stimulater to protect your nails and keep them healthy.
  2. Apply 3 coats of pink iridescent polish over all your nails.
  3. Apply 1 coat of white polish freehand along the tip of the nail in a french tip shape. (Don't worry about being perfectly neat.)
  4. Apply 1 coat of pink holographic glitter tips of nails and all over ring accent nail.
  5. Apply 1 coat of fine holographic glitter tips of nails and all over ring accent nail.
  6. Apply a fast drying top coat to ring accent nail and add 2mm crystals from Born Pretty Store all over nail.
  7. Apply a fast drying top coat to all nails and add 2mm crystals from Born Pretty Store along French tip separation line.
  8. Done!
Products Used


Base coat
OPI Nail Envy
Zoya Anchor base coat

First layer
OM SHE Nail Colour Illusion (3 coats)

Second layer (French Tip)
Sally Hansen Hard as Nails Xtreme wear White On (1 coat)
OPI Teenage dream (1 coat)
Sally Hansen Hard as Nails Xtreme wear Disco ball (1 coat)
Bornpretty Colorful Crystal 2mm Rhinestones SS10 from the Born Pretty Store along French tip separation line

Accent nail (Ring finger)
OM SHE Nail Colour Illusion (3 coats)
Sally Hansen Hard as Nails Xtreme wear Disco ball (1 coat)
OPI Teenage dream (1 coat)
Bornpretty Colorful Crystal Rhinestones SS10 from the Born Pretty Store all over nail

Top coat
Seche Vite dry fast top coat


Disclaimer: Affiliate links are contained in this post.